How to Move a Plex Server to a New Computer
When you set up your Windows Plex server chances are you will eventually want to move that server to a new computer.
Maybe you installed Plex on your main desktop and would like to move it to a dedicated system, or perhaps you would like to upgrade the hardware of your server.
Regardless of the reason, it is easy to move your Plex server to a new Windows computer.
The next few sections will go over how to move your Plex server from one Windows computer to another without having to start over.

1. Preparing the new Plex server
The first step in moving your Plex server to a new computer is to first set up the new server. The following sections will outline the steps involved in setting up the new computer.
i. Install Plex Media Server
The first step is to install Plex Media Server on the new computer that will host Plex.
You would install it just as you did on your current computer.
ii. Sign out of the new server.
Once Plex is installed, you want to sign out of Plex on the new system by doing the following:
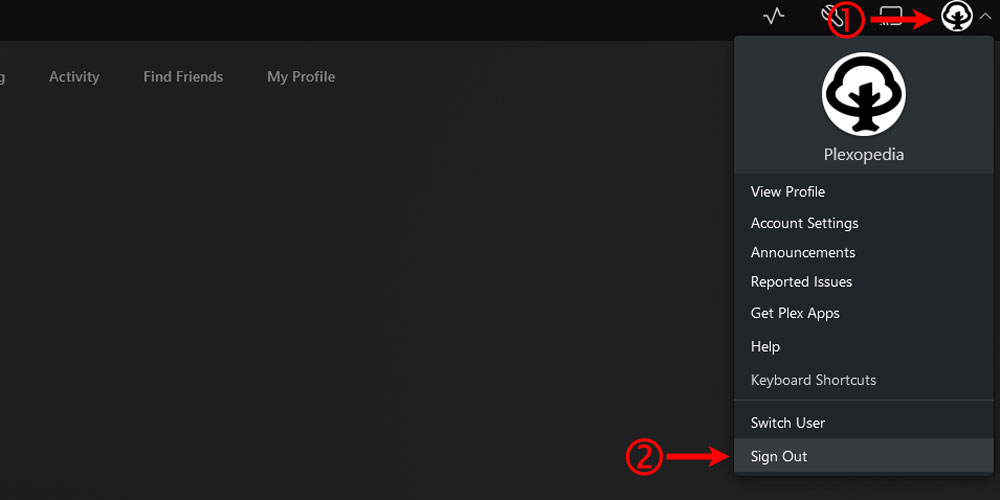
- Click your profile in the top-right corner of the Plex Web App and then click the Sign Out option.

The Plex 'Sign Out' option
iii. Stop Plex Media Server
Before Plex can be transferred to the new server, you should stop the Plex process that is running on the new server.
Stopping the process will ensure no files are in use when the files from the current server are copied. Files that are in use could cause files to be locked when trying to do the copy.
iv. (Optional) Set up Windows standard user account
While I recommend running Plex Media Server under a standard user account in Windows, it isn't necessary.
If you will use a standard user account, you should now set up the account on the new server.
In addition to setting up the standard user account, you will want to stop the Plex Media Server process from running under the administrator account by doing the following:
- Log into the server as the account that installed Plex Media Server.
- Type Windows Key+R to open the Run dialog. In that dialog type regedit.exe and then press Enter.
- In the registry, navigate to
HKEY_CURRENT_USER\Software\Microsoft\Windows\CurrentVersion\Runkey and then delete the value forPlex Media Server.
v. (Optional) Set Plex to run as a service
By default, Plex will run as a process that will require the user running Plex to be logged into the server.
You can set up Plex to run as a service, which means you don't need to have a user logged in for Plex to run.
The steps to set up Plex as a service are described in the How to Run Plex as a Windows Service article.

2. Copy the Plex data
Once the new server has been set up and Plex installed, you can now begin to copy over the Plex data from the current server to the new server.
i. Disable empty trash automatically
If you have Plex automatically empty the trash when media is deleted, disable this setting.
To disable this setting, do the following:
- Open a Web browser and navigate to your Plex server.
- Log into your Plex server with an administrator account.
- Click the Settings icon - the wrench - in the upper-right corner of the Plex server page.
- On the left menu, click the Library option under the Settings section.
- Uncheck the Empty trash automatically after every scan option.
- Click the Save Changes button at the bottom of the page to save your changes.
The main reason to disable this setting is to prevent the new server from automatically removing all data for your media if the new server can't find the media files when it is first started.
ii. Stop the Plex Media Server
Before moving any of the Plex data to the new server, you should stop Plex Media Server on the current server. This will ensure that no files are in use when you copy the files to the new server.
iii. Export the Plex settings
The Plex settings - the values shown in the Plex Web App under the Settings option - are stored in the Windows Registry.
All settings for your Plex Media Server are located under the following registry key:
HKEY_CURRENT_USER\SOFTWARE\Plex, Inc.\Plex Media Server
You simply need to export this key to a registry file and then import that file into the registry of the new server.
This is easily done by using the following steps:
- Type Windows Key+R to open the Run dialog. In that dialog type regedit.exe and then press Enter.
- In the registry, navigate to
HKEY_CURRENT_USER\Softwarekey. - Right-click the
Plex, Inc.key and then select the Export option. - In the Export Registry File dialog, type the following in the File name: field:
%LOCALAPPDATA%\Plex Media Server\plex-settings.reg
After completing the above steps, you should now have a registry file with all your Plex settings saved to the Plex data directory.
iv. Copy the Plex data directory
Most of the Plex data - including metadata and databases - are located in the Plex data directory.
This directory is located in the following location under the user that is running Plex Media Server on the system:
%LOCALAPPDATA%\Plex Media Server
You will need to copy the contents of the above directory to your new server in the same location.
To reduce the time it takes to copy the files to the new server, you can exclude the following directories:
- Cache
- Crash Reports
- Diagnostics
- Logs
- Updates
There are many ways to copy files from one computer to another, so I'll leave it up to you to decide what works best for you.
You will need to make sure that the files are copied into the %LOCALAPPDATA%\Plex Media Server folder of the user who will be running Plex on the new server.
When prompted to overwrite files on the new server, confirm "Yes to All" to ensure all files are copied.

3. Finish the server move
The final steps in the process will happen on the new server. If you haven't, ensure you log into the new server with the user that will be running Plex, and that all files from the old Plex server have been copied to the correct folder.
At this point, Plex Media Server should not be running.
i. Restore the Plex settings
Once all the files have been copied over to the new server, including the registry file that contains the Plex settings, do the following to merge the settings:
- Right-click the Plex settings registry file.
- Click the Merge option in the menu that appears.
- Click the Yes button in the confirmation message box that appears.
- Click the OK button in the success message box.
ii. Make your media available
Now that the Plex files and settings have been moved to the new server, you will need to make your media files available to the new server.
The steps for this are dependent on how you store our media files:
- Internal or external hard drive.
- If your files are one or more external hard drives, connect the hard drives to your new server, and then assign those drives the same drive letters that they had on the old server. This should require no additional work to have Plex find your media files.
- NAS
- For connection to a NAS share, simply connect to the NAS share exactly as you did with the old server. Use the same drive letter to connect to the NAS as you did on your old server.
- Using different storage devices or different drive letters
- If you decide to also change storage devices or drive letters for your new server, then you will need to do some additional steps as outlined below.
ii. Start the Plex Media Server
Now that all the Plex data files and settings have been copied to the Plex server, and the media files made available, it is time to start the new server.
If Plex was set up to run as a server, then start the Plex service. If not, just start Plex Media Server from the Windows start menu.
At this point, all your Plex settings and data will be available in Plex. If you connected your media storage in the same way as you did on your old server, Plex should be able to find the media without any issues.
If you have to change media storage devices, or drive letters, you can have Plex find your media again, by editing each library on your Plex server and then add the new location for the media files.
Once the new paths have been added to each library, you will need to perform a scan for each library. This will cause Plex to now search the new library locations for your media.
Once all your libraries have the correct media files, and you have verified everything is working, then you can remove any of the old paths from the libraries.

4. Final maintenance
For some final cleanup, you can re-enable the Empty trash automatically after every scan option if you previously disabled it.
You can also run the Empty Trash option on the new server.
Running the Clean Bundles option will clean up any leftover media bundles that are no longer needed.
Finally, you should optimize the Plex database.
Your new Plex server should now be up and running in the same way your older server was running.
If you find an issue with this guide, or some steps weren't clear, feel free to contact me.